© 2012 Eskil Heyn Olsen
|
Baltic Blender version 1.3
© 2012 Eskil Heyn Olsen |
| Gasblending using GERG-2004. | |
Some features mentioned in this manual (trimix fills, Volumes and Pricing) are only available as paid upgrades. Completion of all of the examples in this manual will require that you have these upgrades. See Upgrades for more.
Baltic Blender uses the GERG-2004 real gas model to allow a SCUBA gas blender to easily and accurately use partial-pressure techniques to blend available gasses to the desired final mixture. It is not intended as a substitute for proper training and certification in the safety, handling, and blending of high pressure gasses, but rather as a tool to perform the complex math required to reach the desired mixture. In such training classes, you would learn important safety information about the handling of high-pressure gasses. SCUBA gas blending is not to be taken lightly; it is one of the only activities where a mistake may not just kill you, but also those around you, or possibly the diver you are blending the gas for.
Traditional blending techniques have two inherent errors which the blender must learn to compensate for, traditionally by adding a fudge-factor. First, traditional blending uses the simple ideal gas model, but the gasses we breathe, at SCUBA cylinder pressures, are far from ideal gasses. Baltic Blender uses the GERG-2004 real gas model which predicts how the real-world gasses behave. Second, traditional blending generally ignores the heating of the cylinder as gas is introduced, requiring the blender to either fudge or allow the cylinder to cool. Baltic Blender requires that the blender allow the temperature to stabilize, rather than cool, between each step, so that an accurate measurement of the cylinder wall temperature using a commercially available infrared thermometer reflects the temperature of the gas inside.
Throughout the manual it is assumed that you have the equipment and knowledge to safely deliver each of the necessary gasses at the required pressure into a SCUBA cylinder. This assumes a source of high pressure oxygen and oxygen-compatible air are available, as well as helium if desired. In order to utilize the full range of blending capabilities, you will likely require a gas booster in order to reliably and efficiently deliver the oxygen and helium into the cylinder.
This manual contains a series of blending examples intended to introduce you to the features of Baltic Blender.
back to top
Traditional partial-pressure blending using the ideal gas laws is taught by having the
blender calculate the desired pressure of each gas to add to a cylinder. This only works if
the temperature is held constant, and as any blender knows, the gas in a cylinder heats
substantially as the pressure is increased. Partial-pressure blending causes blenders to "think" in
terms of pressure, but Baltic Blender operates internally by calculating the number of molecules of
gas (per unit volume). Consider, for example, an aluminum 80 (AL80) filled to
3000 PSI at a temperature of 70℉. If we heat this cylinder to
100℉, it will now be at a pressure of 3247 PSI. This doesn't mean it contains more
gas; the same amount of gas is at a higher temperature and pressure.
back to top
Mixture refers to the relative percentages of oxygen, helium, and nitrogen in a gas mixture. For
example, Enhanced Air Nitrox (EAN) 32 contains 32% oxygen and the balance is nitrogen. Trimix (Tx)
is specified with the oxygen content followed by the helium content, for example, Tx 10/70 contains
10% oxygen, 70% helium, and the balance is nitrogen. Since we blend gas using atmospheric air as our
source of nitrogen, in reality, the remainder is likely to contain the other trace gasses found in
atmospheric air.
The blender should always assure that the diver requesting a specialty gas is trained and
certificated appropriately for the requested mixture. Generally speaking, certification agencies
have different levels of training for EAN with oxygen levels between 21% and 40%, EAN with oxygen
levels greater than 40%, normoxic Trimix with oxygen levels greater than 18-21%, and hypoxic Trimix
with oxygen levels less than 18%.
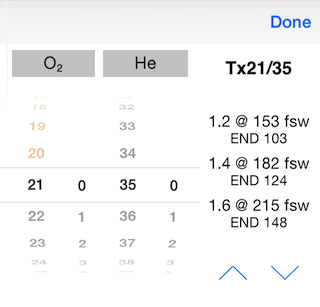
The mixture selection tool is a pop-up dialog which appears when you select a mixture field.
This tool is used to select, among others, the Starting Mixture and Desired Mixture.
A pair of wheels lets you enter the fraction of oxygen in percent and tenths of a percent. If the
Trimix feature is purchased, you can also enter the fraction of helium the same way.
The standard gas presets are oxygen, EAN 80, EAN 50, EAN 36, EAN 32, Air (EAN 20.9), Tx 35/25, Tx
21/35, Tx 18/45, Tx 15/55, Tx 10/70, Tx 7/80. This list of standard gases can be edited in Settings.
As a gas mixture is selected, the Maximum Operating Depth (MOD) is shown for partial-pressures of
oxygen of 1.2, 1.4, and 1.6 atmospheres. The Equivalent Narcotic Depth (END) at the MOD is also
displayed. The Minimum Operating Depth (MinOD) is shown if the partial-pressure of oxygen is less
then 0.16 at the surface. The END is calculated based on the nitrogen exposure; it can be calculated
taking into account helium and oxygen exposure if so enabled in the Settings.
As a visual reminder that the mixture is moving from normoxic towards hypoxic, a gas mixture with
less than 20.9% oxygen will be shown in orange, and a mixture with less than 18% oxygen will be
shown in red.
All pressure readings are indicated in gauge (relative to the ambient atmosphere), not absolute
(relative to a vacuum). For example, an empty cylinder is at 0 PSI gauge, which is
14.7 PSI absolute. If your fills are taking place at high altitude, there will be a
minor error introduced (e.g., at 7000ft above sea level, there will be an error of roughly
4 PSI). It is recommended that you use a high-quality digital gauge which reads
pressure relative to ambient.
All temperature readings are the temperature of the gas inside the cylinder. This is obviously
difficult to measure directly, so instead we wait for the temperature of the gas to reach thermal
equilibrium with the cylinder wall and measure its temperature. How long do you need to wait? After
adding gas to a cylinder, if you continue to observe the temperature you'll notice that it continues
to increase and stabilizes. This typically takes a few minutes, but experimentation and experience
will quickly teach you how long is long enough. It is recommended that you use a infrared
thermometer to measure the cylinder wall temperature. Even a cheap one is pretty accurate. (These
are sometimes incorrectly described as "laser" thermometers because all but the cheapest models use
a red laser pointer to show you where they are aimed, but the laser is not involved in the
temperature measurement.) An infrared thermometer is not accurate when measuring a metallic
object (for example, if you point one at a mirror it will report the temperature of the object
reflected in the mirror, not the temperature of the mirror surface). The proper procedure for
unpainted SCUBA cylinders is to measure the temperature of a sticker or tape attached to the
surface, e.g., the annual Evidence of Inspection (VIP) sticker.
The first is in Starting Mixture and should be set to the temperature of the cylinder
when the initial mix and pressure is read. After the mix and pressure is entered, this slider
should not be changed until you have completed the blending.
The second slider, at the bottom of the Step-by-Step section, is the "current"
temperature of the cylinder. As you go through the steps, you will be changing this slider to
calculate the correct fill pressure for each gas. This is the slider you'll be using most.
A third slider appears at the top of the Step-by-Step section if you use a
preblend-gas, and have less than the maximum amount available. See Using
Preblended Gas.
Tapping on the dark area on the left or right end of the slider moves the slider in small steps
for better precision.
All blending software requires you to enter a starting gas mixture (the gas that is currently in
the cylinder) and a desired mixture (the gas you want to end up with) and presents a step-by-step
set of instructions to accomplish the blending. Baltic Blender requires that you enter into
the Starting Mixture section the mixture, pressure, and temperature that you are starting
with. Remember—even an empty cylinder contains gas at atmospheric pressure, so an empty cylinder
must still have the starting pressure (zero), mixture (air, or whatever was last in the cylinder),
and temperature entered before Baltic Blender will perform blending calculations.
The Desired Mixture section is where you enter the mixture and pressure that you'd like
the full cylinder to contain after the blending process. Note that this pressure is always described
at the configured standard temperature (defaults to 70℉); you do not enter a final temperature.
For example, under US regulation 49 CFR Part 173 Subpart G Section 173.301a(c) and 173.302a(b) a cylinder may not exceed the marked service pressure at 70℉.
In our earlier example of an AL80 filled to 3247 PSI at 100℉,
the cylinder is not overfilled because if it were cooled to the configured standard temperature (eg. 70℉), it would contain
3000 PSI. Similarly, cylinders filled and used in very cold environments legally need
to contain less than their service pressure. You should check your local laws and regulations
regarding high pressure cylinders.
Now we're ready for our examples. Each example below is intended to teach you about a specific
set of features of Baltic Blender; they get progressively more complicated.
A customer purchases an empty AL80 cylinder and requests that you fill it with EAN
32. You install the valve and begin blending. Because the cylinder was previously opened to the
atmosphere, enter a Starting Mixture of air at 0 PSI and measure and enter the
starting temperature, say 75℉ in this example. There is no preblend gas in this example,
so we leave this field blank. This field will be discussed in a later example. Next, we enter
a Desired Mixture of EAN 32 at 3000 PSI. Only when all of the
required Starting Mixture and Desired Mixture parameters are entered will
the Step-by-Step instructions appear. Once these parameters are entered, they should not
be changed until the blending operation on this cylinder is completed.
In the Step-by-Step section, we read that the first step is to add oxygen to 411 PSI
at 75℉. However, after adding 411 PSI of oxygen, we will find
that the cylinder is hotter than 75℉, and therefore we have actually added less than the
amount required. After waiting a few minutes for the temperature to stabilize, we measure the
temperature, and say it is at 85℉. We enter this new temperature into the slider in
the Step-by-Step. Baltic Blender now calculates that the correct final pressure of the oxygen
at 85℉ is 420 PSI, so we add slightly more oxygen before proceeding to the
next step. It is important to understand that 411 PSI of oxygen at 75℉
is the same amount of gas as 420 PSI of oxygen at 85℉.
You have not added the correct amount of oxygen unless you reach the indicated pressure when
the Step-by-Step temperature slider is set to the measured temperature. Because the second
addition of oxygen is small, the further temperature rise that occurs is negligible and can be
ignored, and the blender can proceed directly to the next gas without further temperature
measurement and correction.
The pressure-temperature relationship is an important concept. For example, suppose we added
411 PSI of oxygen, and, with the cylinder now at 85℉, we left for lunch
knowing that we didn't yet have the full amount of oxygen added and intending to perform the top off
later. However, we didn't make it back to the shop after lunch because of the 12″
of snow that fell while we were away, and when we do make it back the next day, the cylinder is now
at 45℉. If we measure the pressure, we'll find it at 376 PSI. If we enter
the temperature 45℉ into the Step-by-Step temperature slider in Baltic Blender, it
will now show us the correct top-off pressure for the oxygen is 385 PSI at 45℉.
Back to our original example, now that we've topped off the oxygen to 420 PSI at 85℉,
it is time to add the air. Baltic Blender calculates that we would add air to
3125 PSI at 85℉. We then allow the temperature to stabilize and measure it
at, say, 120℉. We enter this number into the Step-by-Step slider and Baltic Blender
calculates that we would add air to 3415 PSI at 120℉.
We add the additional air, but since this is a pretty big step, and will result in substantial
additional heating, it may be necessary to perform a third iteration to reach the desired pressure
at the measured temperature.
After the gas is allowed time to homogenize, the gas mixture can now be tested and the cylinder
delivered to the customer.
Following this iterative process correctly is vital to achieving a correct final blend.
If you have any confusion at this point or have not obtained the same results as shown in this
example, please re-read this section and practice again until you can reproduce the results shown.
The blender should resist the temptation to fudge by not following the instruction precisely.
This is a practice that all blenders learn when using ideal gas laws, and it will only
introduce error into the final mix when using Baltic Blender. As you gain more experience with
Baltic Blender, you may slightly "overshoot" on the pressure when you know that the actual
temperature is hotter than the temperature slider, especially with the final air fill. For example,
in the above example you could have added air to more than 3125 PSI initially, knowing that the
heating of the cylinder would require it. A better technique is to measure the temperature more than
once. In the above example, as the air pressure approaches 3125 PSI, and before allowing the
temperature to stablize, I might measure a temperature of 112℉ and immediately enter this into the
Step-by-Step temperature, and continue adding air to the calculated 3348 PSI at 112℉.
Only then do I stop, stabilize, measure, and top off.
Note that we're doing calculations based on delivering precise amounts of gas into the
cylinder. Some fill station configurations have long fill whips or manifolds that hold large
volumes of gas. If you precisely finish adding oxygen and then pump air into the cylinder without
bleeding the whip, you'll be driving the remaining oxygen in that hose into the cylinder. As Baltic
Blender can't predict this volume of gas, the most accurate technique calls for bleeding the fill
whips and other dead space whenever changing gasses. This is especially important when blending
hypoxic Trimix, as the low oxygen content will be significantly affected by any excess oxygen added
to the cylinder.
An apparent source of error is measurement error in the gas sensors. Oxygen sensors are only
accurate when calibrated on dry gas using a mixture close to the mixture being tested. If an oxygen
sensor is calibrated on air, it may not accurately measure high oxygen gasses like EAN 50 or EAN
80. Helium sensors can be even less accurate, with most being accurate to only 2-3% of the total
mixture. If your first attempt to mix Trimix 21/35 reports 20.8% oxygen and 37.5% helium, resist the
temptation to correct this mix or add a fudge in future blending to "get this right". Chances are
that the discrepency is sensor error!
With patience, experience, and proper technique, Baltic Blender should be able to reliably mix
the oxygen content within .2% of the desired mix and the helium content well within the 2% accuracy
of most analyzers.
Your customer is amazed with your incredible blending prowess and returns the next day with the
same cylinder asking for a fill of EAN 36. She tells you that she's diving a wreck tomorrow and the
propeller is at 95 feet. She wants to be sure that you won't be rich on your mix.
You analyze the mixture and find it is EAN 32.3 at 526 PSI and 75℉ and enter this into
the Starting Mixture fields in Baltic Blender. In the Desired Mixture field you enter
EAN 36 and 3000 PSI.
As in the first example, you add oxygen, measure and enter the temperature, top off the oxygen
and add air, measure and enter the temperature, and top off the air. In this example, blending into
a partially full cylinder is no different than an empty cylinder.
The customer returns the next day with tales of woe about the bad conditions and the aborted dive
on the wreck. Her next dive is deeper, and she wants a fill of EAN 32. You analyze the mixture and
find EAN 36.1 at 2500 PSI and 75℉ and enter this into the Starting
Mixture. In the Desired Mixture fields you enter EAN 32 and 3000 PSI.
Note—a blending operation that requires a bleed off requires one because there is already
too much of one of the components in the cylinder, oxygen, helium, or nitrogen (i.e., air). One of
the characteristics of a blend that requires a bleed is that at least one of these three will not
need to be added. As a consequence, a bleed done because a cylinder has too much nitrogen (air) will
require adding oxygen or helium at high pressure (3000-3500 PSI or more, depending on the
temperature). Doing so will require a source of oxygen at a higher pressure than the typical supply
cylinder, or an oxygen-safe gas booster. High pressure oxygen is dangerous; even more so if the fill
station equipment, cylinder, or cylinder valves are not 100% clean of any hydrocarbons. A blending
operation like this is a tradeoff between economy and safety; safety can be improved by bleeding
more gas than the minimum, which then permits you to add the oxygen at a lower pressure. Simply
enter the new pressure and temperature in the Starting Mixture field, then add the oxygen
(now at a lower pressure) and air.
The following examples require purchasing the "Trimix" upgrade. See Upgrades for more.
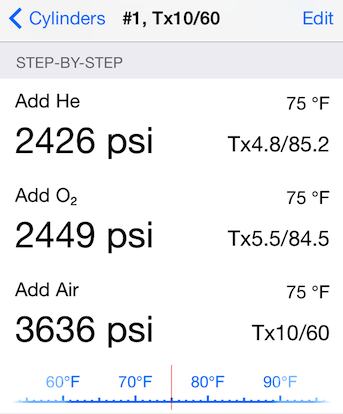
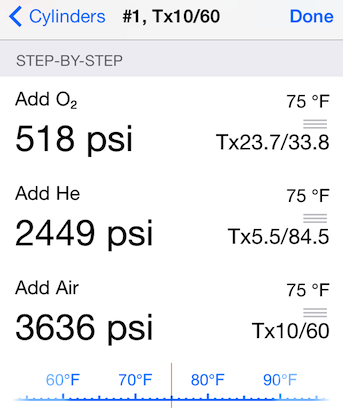
The customer brings in a set of double cylinders containing 500 PSI at 75℉
of Trimix 21/35 (Tx 21/35) and requests that they be filled to 3600 PSI of Tx 10/60. After
counseling him on the evils of diving with non-standard gas mixes and overfilling his low-pressure
cylinders, you enter this information into the Starting Mixture and Desired Mixture
fields. In this case, the Step-by-Step will show the helium, oxygen, and air to be added in
that order. After determining that your helium cylinder is almost full and your oxygen cylinder is
nearly empty, you decide that you would prefer to add the oxygen first and then the helium. You can
touch the "Edit" button and slide the individual blending steps up or down using the gray parallel
bars on the right side of the steps to change the order of the gasses, in this case, to move oxygen
before the helium. However, do not change the order once you've started the blending
operations.
After completing the blending in Example #4, the same customer calls to tell you that his
teammates decided not to dive with a "stroke" and he won't be needing that mixture after all. You
would hate to bleed out $100 worth of helium, but don't have any other use for this weird Tx 10/60
gas. This introduces the next concept—"preblend" gas. In the first four examples, we ignored the
"Preblend" option in the Starting Mixture field. The Preblend field serves one of two
purposes—you can use it to consume an unneeded gas which is already mixed, such as the Tx 10/60
left over from the previous mix (or a gas which needs to be bled from another mix), or you can use
it to calculate Step-by-Step using a non-air top-off gas (such as EAN 32 from a
continuous-blend-fed compressor). Let's examine the first case in Examples #5 and #6.
You can clear the Preblend field by left-swiping it and touching "Clear".
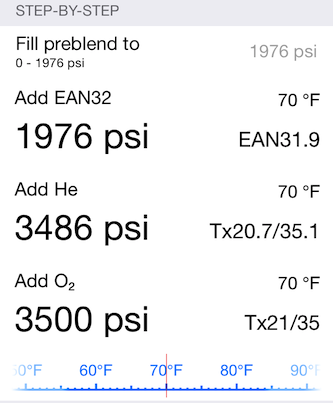
Using the same starting point as Example #5, consider what would happen if you ran out of
Tx 10/60 during this blend and were unable to reach the called-for pressure and temperature. You'll
notice at the top of the Step-by-Step a field labeled Fill preblend to. Enter the
actual pressure that you managed to reach using Tx 10/60, say, 2000 PSI, and a third
temperature slider will pop-up below it. Enter the temperature at which you reached
2000 PSI, say, 85℉.
You can clear the Fill preblend to field by left-swiping it and touching "Clear".
You're nearly out of oxygen, but have a membrane system feeding your compressor that produces
unlimited volumes of EAN 32. Noting that most standard Trimix gasses can be made from helium and EAN
32, you want to use preblended EAN 32 as a top-off gas. Enter a Starting Mixture of
0 PSI of air at 70℉, and a Preblend gas of EAN 32.
Enter a Desired Mixture of Tx 21/35 and a final pressure of 3500 PSI.
The Step-by-Step instructions indicate first adding EAN 32, then helium, then oxygen. Because
the EAN 32 comes from your compressor at high pressure, you'll want to add it last, so you use
"Edit" mode as in Example #4 to change the order of the gasses to put EAN 32 last.
When you do this, you'll notice that the field that allows you to enter how much preblend gas
that you added in Example #6 disappears. If the preblend gas is not the first gas, it is assumed
that you have enough gas to complete the mix. Baltic Blender will not let you add a second helping
of the primary gasses. If you ran out of preblend gas in this case, you'll need to analyze the gas
in the cylinder and enter this information into Baltic Blender as a new Starting Mixture.
When using this technique, you may also notice that a very small amount of oxygen (in this
example) or air is called for to get precisely the mix you want. If the amount is very small, you
could ignore it and tolerate the inaccuracy in the mix. If you have control over the preblend EAN
32's exact oxygen content, you could try adjusting it until the Step-by-Step additional air
or oxygen is minimized.
Consider
a Starting Mixture of air at 0 PSI and 70℉. A Desired Mixture
of EAN 18 at 3000 PSI. Baltic Blender will express its displeasure in the
situation by calling for you to Add N2 in
the Step-by-Step instructions. Your typical SCUBA shop will not be equipped to blend the
nitrogen required. Check the Desired Mixture when this happens, as you've probably make
an error in your entry.
Similarly, if a cylinder starts with a helium-containing mixture and the Desired Mixture
does not contain helium, the Step-by-Step will call for completely emptying the cylinder of
the helium-containing gas and, as above, it will warn you that it Cannot
compute exact blend because of the amount of residual helium. In practice, divers do not
want to waste helium and it makes no sense to bleed off a small amount of, say, Tx 18/45 because
your next dive requires EAN 32.
In this circumstance, to avoid wasting helium, set your Desired Mixture to account for the
helium already in the cylinder. Specifically, experimentally find a value for the helium content of
the Desired Mixture in which there's a negligible bleed or a negligible helium addition. For
example, if your Starting Mixture is Tx 18/45 at 1500 PSI and you would like EAN 32, you'll
find that if you instead set your Desired Mixture to Tx 32/20.2 that you would be required to
bleed off only 2 PSI, which could be safely ignored. Before performing this procedure, be sure to
discuss with the diver the option to keep, rather than bleed, the residual helium in the cylinder.
If he chooses to keep the helium, inform him how much residual helium will be in the resulting
mixture.
The Settings screen can be accessed by tapping the wrench icon on the bottom of the screen.
If you've purchased the "Volumes & Pricing" upgrade, you can enter the information about the size
of the cylinder filled, and Baltic Blender will calculate the volume of gas added. All gas volumes
are corrected to standard temperature and pressure (1 atm at 70℉). If you've configured the
price of the gas (per volume unit) in the Settings screen, Baltic Blender will also calculate the
amount to bill the customer.
When technical doubles are filled, the volume of a single cylinder should be doubled. For example, when filling a set of LP85s, the volume would be entered as 170cuft at 2640 PSI. The same set of LP85s would be entered as 26.4 litres in metric.
Once the cylinder size information is entered, and the pricing information is configured
under Settings, line items will appear by each gas volume showing the amount used and the
cost. The preblend gas costs, if any, will be accounted for separately. If the preblend was a
customer-provided gas, you can uncheck the boxes to remove them from the total.
The reader may find it amusing
to enter a fill of an empty LP85 cylinder to a mixture of 100% oxygen. You'll note that the cylinder holds 89.6 cuft of oxygen.
This is because oxygen compresses more readily than an ideal gas.
To print or email a bill, tap the Total cost cell in the list of
tanks. This will present the various options for exporting the bill. Remember, to print, you need an
AirPrint enabled printer. In Settings, you can specify a header to put on bills.
Baltic Blender lets you work on more than one cylinder at a time. When blending many cylinders,
you can use this to save time and reduce the gas lost to purging the blending station lines. For
example, if you have many Trimix fills to do, add the helium to all the cylinders at one time,
rather than switching back and forth between adding helium and oxygen. By the time you get to the
last cylinder, the temperature of the first one will have stabilized and be ready for the helium top
off.
You can name a cylinder by tapping the cylinder name. The default name will contain the desired
mixture and cylinder volume, if set.
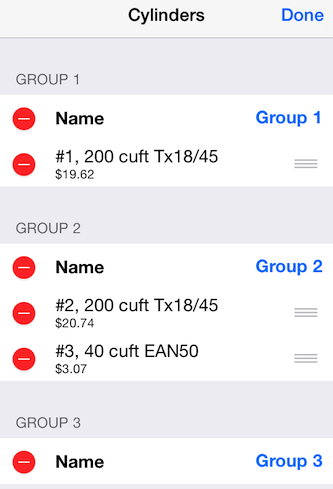
Baltic Blender also lets you group cylinders together for price calculations and billing purposes
(a feature available as an upgrade). To use this feature, you need to configure prices
in Settings, and for each cylinder you need to specifiy the cylinder size information. If
some of the prices or cylinder sizes are not entered, a partial total will be shown in gray. When
all the information is entered, the total group cost will be shown.
Cylinders can be rearranged between and within groups. Tap the Edit button at the top
of the cylinder list, and you can drag cylinders between and within groups.
While in Edit mode, you can move cylinders to a new group by dragging them to the bottom,
where there'll be an empty group when editing; and you can also name a group by tapping the group
name.
The trashcan icon at the bottom of the Cylinders page can be used to delete all cylinders
and groups.
Sometimes it may be necessary to top off a cylinder with another gas in the field, when
oxygen or helium is not available. When you do this, you aren't targetting a particular
mixture, but rather asking Baltic Blender to calculate what the resulting mixture will be. If
the Desired Mixture is left blank, Baltic Blender will calculate the resulting
mixture. If you are using a top-off mixture other than air, enter this into
the Preblend field.
To compute a topoff mixture, fill in:
The Step-by-Step cell will now show the topoff mixture. As in a regular blend,
moving the temperature slider in the Step-by-Step will change the displayed pressure to
account for the temperature rise.
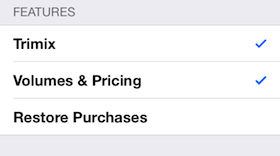
Some features discussed here are available only through paid upgrades.
Trimix fills—Allows blending of mixtures containing helium. Preblended gases can
also be helium-based.
Volumes & Pricing—Computes the volumes of gasses added to the clyinder in the
blending process, separating oxygen and helium in both base and preblend sources. Configurable
prices and price calculation.
To purchase these upgrades, go into Settings. At the bottom you'll find a button for
each feature.
If you've bought a new iOS device or otherwise lost the purchases, you can restore the
purchases from this screen using the Restore Purchases button.
Baltic Blender version 1.3
Gasblending using GERG-2004.
© 2012 Eskil Heyn Olsen
More Baltic products at www.balticdecoplanner.com
Support at www.balticdecoplanner.com
Thanks to Kenneth Adelman for ideas, testing and help.
Thanks to Gabrielle Adelman for writing documentation.
GERG-2004; Kunz, O.; Klimeck, R.; Wagner, W.; Jaeschke, M. (2007): The GERG-2004 Wide-Range
Equation of State for Natural Gases and Other Mixtures: GERG Technical Monograph 15 (2007) and
Fortschr.-Ber. VDI, Reihe 6, Nr. 557, VDI Verlag, Düsseldorf, 2007.
The partial GERG-2004 implementation used to calculate the compressibility factors of oxygen,
helium, nitrogen and their mixtures in the gas phase was inspired by open source code written by
David de Marneffe in December 2007. David can be contacted at daviddemarneffe[at]y a h o o . c o m.
Basic Concepts
Mixture
The up and down arrows can be used to select from a set of standard
gasses. Up selects a gas which is richer oxygen content than the current selection
(up meaning used at shallower depths) and down selects a gas with a leaner oxygen
content. If the Trimix feature has been purchased, the helium-containing gasses will always be
found deeper than the non-helium gasses regardless of oxygen content. Even when making a
non-standard selection, these buttons are a quick way to get close to the desired mix, and then
minor adjustments can be made directly with the percentage wheels.
Pressure
Temperatures
There are 3 temperature sliders:

Starting Mixture
Desired Mixture
Blending Examples
Example #1—Blending Nitrox into an empty cylinder


Before adjusting temperature.
After adjusting temperature.
Sources of error
Example #2—Blending Nitrox into a partially full cylinder
Example #3—Blending requiring a bleed
Well, surprise, the cylinder already has too much oxygen. Topping off the cylinder to
3000 PSI with air would result in a mixture of approximately EAN 33.9. Accomplishing the
required blending will require bleeding off some of the gas already in the
cylinder. Baltic Blender will calculate the required bleed and tell you to bleed the cylinder
down to 2149 PSI at 75℉. As you do so, the cylinder will cool,
so, just like adding gas, you will need to wait for the temperature to stabilize, enter the
new temperature (for example, 65℉), and do a final bleed to the corrected pressure,
2094 PSI at 65℉.

Example #4—Blending Trimix
Before rearranging the gases.
After rearranging the gases.
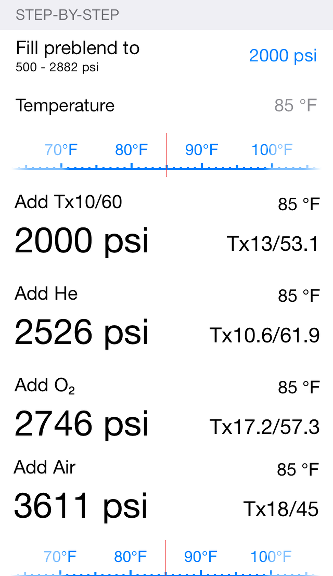
Example #5—Using preblended gas
Enter a Starting Mixture of Tx 21/35 at 500 PSI and 75℉ , and
a Preblend of Tx 10/60. The Desired Mixture should be Tx 18/45 at
3500 PSI. The Step-by-Step instructions have you add preblended Tx 10/60 to
2825 PSI at 75℉. Do so, and iterate topping off the Tx 10/60 until you
reach the pressure and temperature called out. Then iterate through the oxygen and air as
required. Note in this example, no pure helium was required. What limited the amount of Tx 10/60
that could be used in mixing this gas was the helium content of the Tx 10/60. Preblend
used in this manner will always completely replace one of the other three gasses.

Example #6—Using preblended gas that runs out
At this point, the amount of gas added by the Tx 10/60 is now "locked" in, and the
remaining Step-by-Step instructions will tell you how much of helium, oxygen, and air to
add to complete the blending. Do not change the preblend pressure and temperature once
set. These values, like the Starting Mixture, should not be changed until the
blending operation on this cylinder is completed.
Example #7—Using non-air top-off mixtures

Before moving the preblend.
After moving the preblend.
Error Conditions - when you can't blend that exact mixture
Mixtures with too much nitrogen
If you try to blend a mixture which contains a ratio of nitrogen to oxygen greater than that
found in air (79:21), another source of purer nitrogen would be required. These gasses are not
normally used in SCUBA and Baltic Blender will alert you to this unusual condition.

Problems caused by the inability to completely empty a cylinder
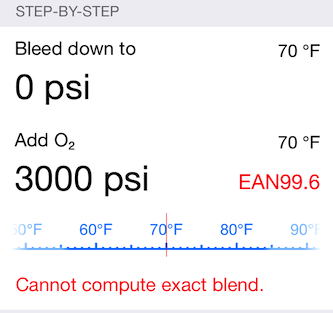
Unless you use a vacuum pump, you can't bleed a cylinder completely empty. Consider
a Starting Mixture of 100 PSI of air at 70℉ and a Desired
Mixture of 100% oxygen at 3000 PSI. Even if you bleed the cylinder completely,
there is still 14.7 PSI of air in the cylinder containing
nitrogen. The Step-by-Step instructions will tell you to bleed the cylinder to 0 PSI, add
oxygen to 3000 PSI, but it will warn you that it Cannot compute exact
blend and tell you that the result would contain EAN 99.6. Should it be necessary to
fill a cylinder with oxygen purer than 99.6%, fill and purge the cylinder with oxygen first, and
then enter a Starting Mixture of 0 PSI of 100% oxygen.
Settings
Calculating Gas Volumes and Cost
The size of the cylinder is described as the gas volume capacity at the Service Pressure. Eg, a low-pressure steel 85 cubic foot cylinder (LP85) would be entered as 85 cuft and 2640 PSI (even if the cylinder is under- or over-filled).

Groups and Cylinders

Cylinder groups.
Editing and moving cylinders.
Topoff

Upgrades
Release Notes
About